Vegan Sweet Lemon Cake (or Cupcakes!)

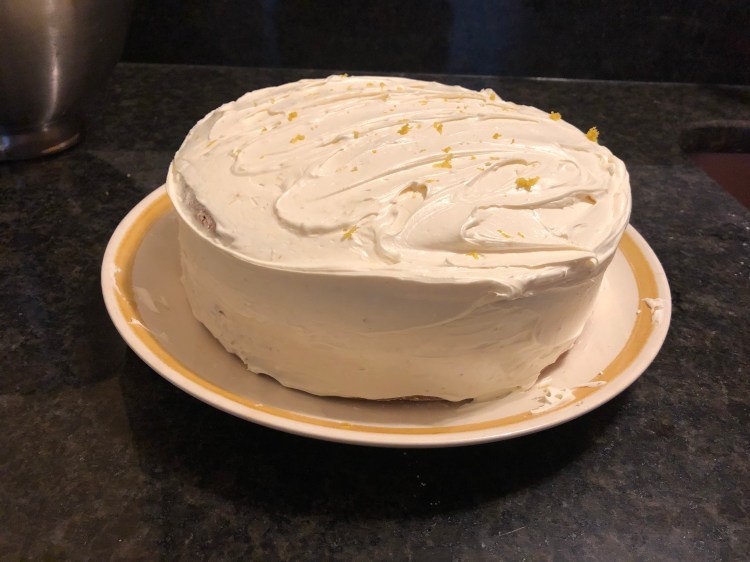
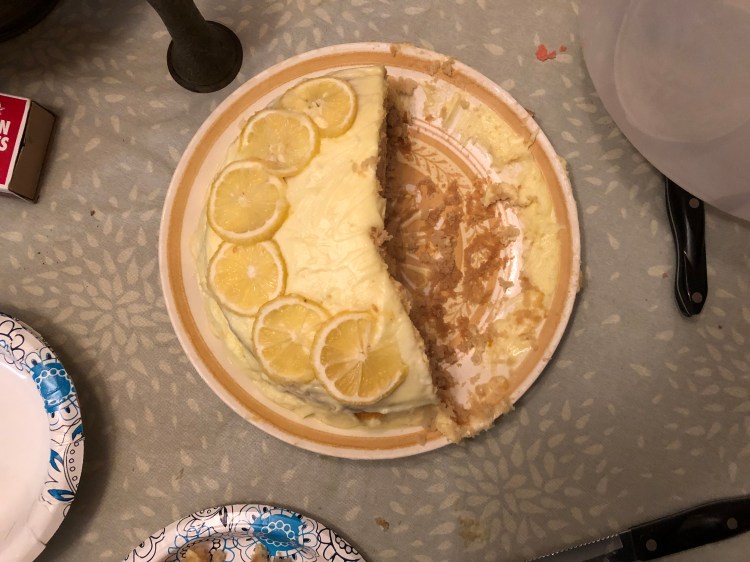
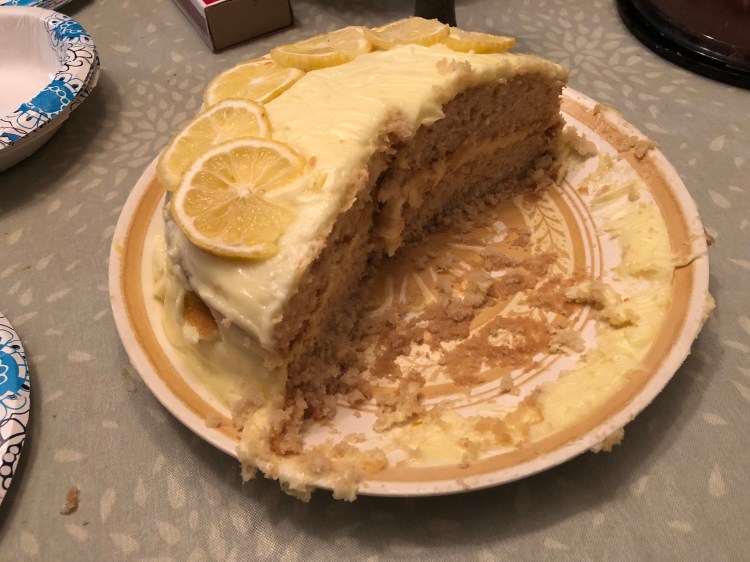
This vegan lemon cake is perfectly sweet, tart and fresh and will impress anyone! It’s a perfect spring cake for Easter, birthdays, Mother’s Day or just because. No one will be able to tell it’s vegan!

I needed a last minute (night before!) cake for my Mema’s 85th birthday. Whenever we go to visit her we bring her a box of thin lemon Oreos. We have completed bonded over how delicious these little cookies are. We definitely needed a lemon cake for her birthday.

My favorite cake recipe comes from Sam from It Doesn’t Taste Like Chicken (hey, Sam!). I seriously make her chocolate cake recipe several times a year. It’s always a hit with vegans and non-vegans. When deciding how to make this recipe I went directly to her page looking for a lemon cake recipe. She doesn’t have one yet but I was able to customize her vanilla cake to be exactly what I needed. It turned out so amazing that I just had to share!

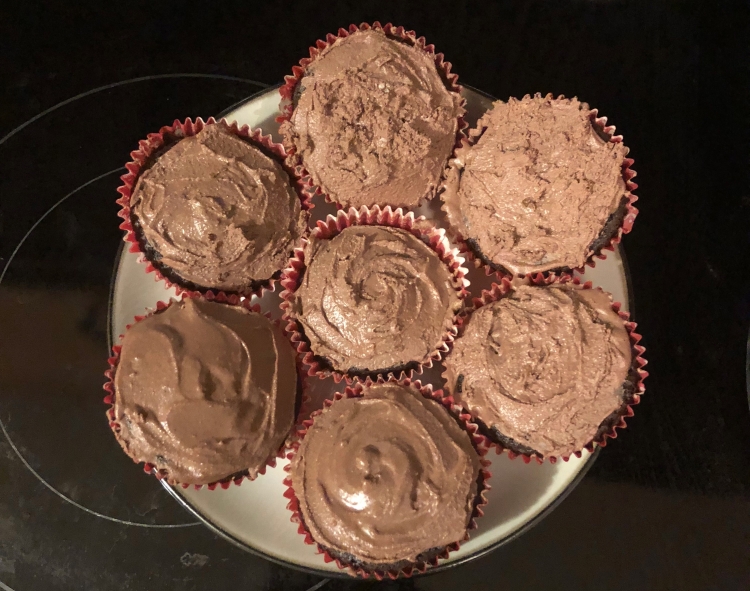
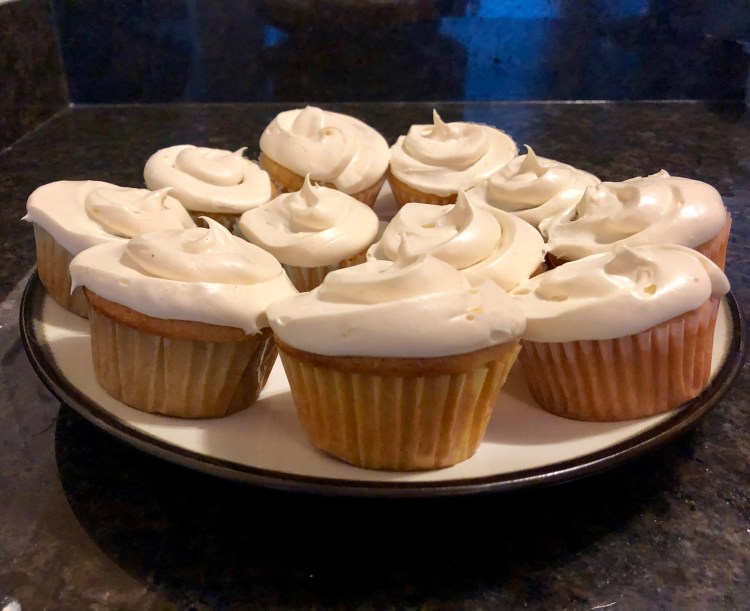
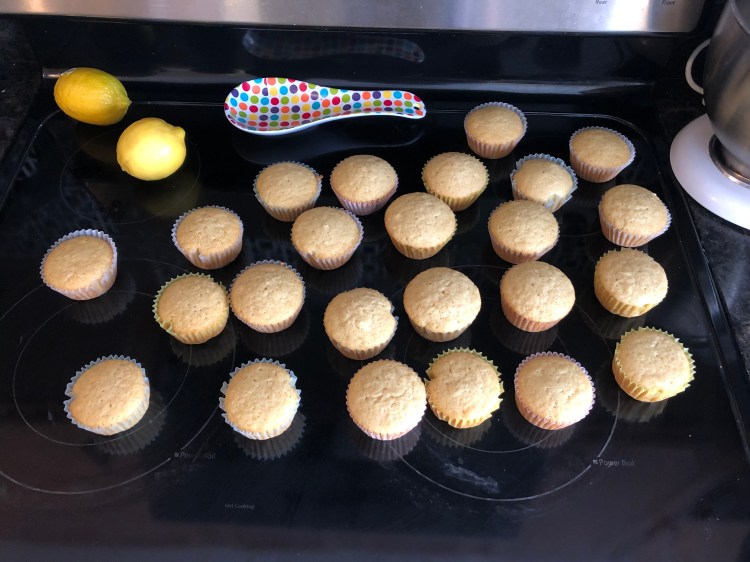
Update: this recipe also makes AMAZING cupcakes. They are perfect for gifts and sharing!

Need something deliciously lemony but a little faster? Check out my 15-minute vegan cookies!

Prep time: 10 minutes

Bake time: 22-28 minutes

Total time: 32-35 minutes

Ingredients:

Dry Ingredients:

2 1/2 cups all-purpose flour

1 1/2 cup white sugar

2 teaspoon baking soda

1 teaspoon salt

Wet Ingredients:

1 1/3 cup non-dairy milk (I used an almond coconut blend from Silk)

2/3 cup light oil (I used vegetable)

1/4 cup fresh lemon juice

1 tablespoon vanilla extract

Zest of 1 Lemon

Frosting:

1/2 cup vegan butter

1/2 cup vegetable shortening

4 cups powdered sugar

1 teaspoons vanilla extract

Zest of one lemon

1-4 tablespoons fresh lemon juice

Optional: 1/2 teaspoon turmeric for color

Optional: fresh lemon slices for decoration

1. Preheat your oven to 350 degrees Fahrenheit. Oil and flour 2, 9 inch baking pans. Or line a cupcake pan with 24 liners.

2. In a large bowl combine all the dry ingredients. Whisk together until well combined.

3. In a medium bowl combine the wet ingredients. Mix well. Add the wet ingredients to the dry ingredients. Using a spatula mix everything together until just combined. No need to worry about lumps so don’t over mix!

4. Divide batter evenly between baking pans. Bake 22-28 minutes until golden brown and a toothpick inserted into the center comes out clean. For cupcakes bake for 18-20 minutes until the center cupcakes are golden and a toothpick comes out clean. Refrigerate cakes until completely cool. Make sure they are cool before removing from the pans!

5. While cooling make the frosting! Combine the powdered sugar, vegan butter, vegetable shortening, vanilla extract, turmeric and zest using a stand or hand mixer. Add in fresh lemon juice one tablespoon at a time until you achieve your desired consistency and flavor.

6. Once the cakes are cool, frost, decorate and enjoy!

Keep cake refrigerated as the buttercream frosting will melt otherwise!

Let me know what you think and if you give this recipe a try!

15-minute Vegan Cookies

IMG_9684.jpg

pinterest

These cookies are so incredibly easy; with only 4 ingredients and about 15 minutes there is no way to go wrong! I love how chewy and sweet they are. They are perfect for a potluck, a bake sale or just a quick dessert. Y’all know how much I love a partially homemade recipe. My Vegan Pumpkin Spice Cake with Maple Cinnamon Frosting and the Two-Ingredient Brownies are among the most popular recipes on the blog!

img_9613.jpeg

I originally made these in red velvet for Valentine’s Day gifts but after Valentine’s Day why do the sweets have to end? I made these again in lemon so that I wouldn’t splurge on those delicious lemon Girl Scout cookies (accidentally vegan but $4 a box ) These cookies are so much less expensive and your house smells like cookies while they’re baking. Plus the options are endless for flavors! Any flavor box of vegan cake mix should work well!

Definitely give these a try!


Prep Time 5 minutes

Bake Time: 10 minutes

Total Time: 15 Minutes


Ingredients:

1 box of accidentally vegan cake mix

2 flax or chia eggs (See below)

1/3 cup vegetable oil

1-2 cups powdered sugar

  1. Preheat your oven to 375 degrees Fahrenheit.
  2. Make your chia or flax eggs and set aside (Mix 2 tbsp of chia or flax seeds with 5 tbsp of water).
  3. Mix together the box of cake mix with the oil and the vegan egg once it is a gel like consistency. The dough will be thick so this might be a bit of an arm workout! I used my stand mixer to help. If the dough is very dry try adding a tablespoon of water to help mix.
  4. In a small bowl add 1 cup of powdered sugar to start ( Add more as needed). Scoop about 1 tablespoon sized balls of dough and cover well in powered sugar.
  5. Place balls on a silicone mat lined baking sheet Use a glass or your hands to press down slightly. Place cookies 1-2 inches apart.
  6. Bake for 10-12 minutes until very slightly golden along the edges. They will still be soft coming out of the oven. (if using parchment paper or an unlined baking pan may need to adjust baking time down Closer to 8-10 minutes)
  7. This recipe makes about 20-25 cookies, mostly depending on the box cake mix and how much dough you eat. Let cool on baking sheet. Enjoy!


This is based on a Tasty Recipe.

Let me know what you think and if you give these cookies a try!

Award Winning Vegan Chili

IMG_9692
pinterest
This chili recipe is deliciously hearty and a spicy sweet twist on a traditionally meat heavy recipe. My job just had a chili cook off and I knew I needed to perfect my chili recipe. Normally I keep my recipe pretty simple but I knew if I was competing against meat heavy recipes and people who are literally afraid of vegetables I needed to take it up a notch.
IMG_9695
I pulled out two secret ingredients, one is a can of chipotle peppers in adobo sauce and the other is sweet potato! Combined they make such a spicy and sweet perfect chili. Of course I served this with Sam Turnbull’s amazing cornbread recipe from her blog, It Doesn’t Taste Like Chicken. Thanks for the cornbread recipe, Sam!
My coworkers LOVED the chili! Everyone ate some. They had no idea it was even vegan! Definitely give this recipe a try!
I made this recipe in a slow cooker but it can be made on the stove top.
Cook time: Slow cooker: 4 hours Stove top: 20-30 minutes
This makes about 6-7 servings
Ingredients:
3 cans of beans, (I used black, dark red kidney and pinto)
1, 7 oz can of chipotle peppers in adobo sauce (*Spicy!*If you’re not into too much spice, adjust the amount of peppers or omit)
2 tablespoons of brown sugar
1 cups TVP (rehydrated)
1 15 oz can of tomato sauce
2 teaspoons garlic powder
2 teaspoons onion powder
2 teaspoons smoked paprika
1 tablespoon chili powder
1/2 teaspoon cinnamon
2 medium sweet potatoes
1 cup frozen sweet corn
Salt and pepper to taste
1. Re-hydrate TVP by adding it to a medium bowl and covering with warm water. Cover with a lid or plate and let it soak for 10 minutes. Drain and add to pot or slow cooker.
2. Peel and chop sweet potatoes into 1/2 inch cubes add to pot or slow cooker.
3. Empty entire can of chipotle peppers and chop until its nearly a paste. Add to pot.
4. Rinse and drain beans and add to a pot. Add all of the other ingredients and spices (minus the sweet corn).
5. Mix well. If using a slow cooker cook on low until sweet potatoes are tender about 4-5 hours.
6. If using the stove bring up to a boil. Cover and bring down for a simmer. Simmer for 20 minutes or until potatoes are tender.
7. Stir in corn. Serve warm with cornbread. Enjoy!
Let me know what you think and if you give this recipe a try!

This recipe is featured on Buzzfeed’s Tasty!

Creamy Vegan Gnocchi Soup

IMG_9600
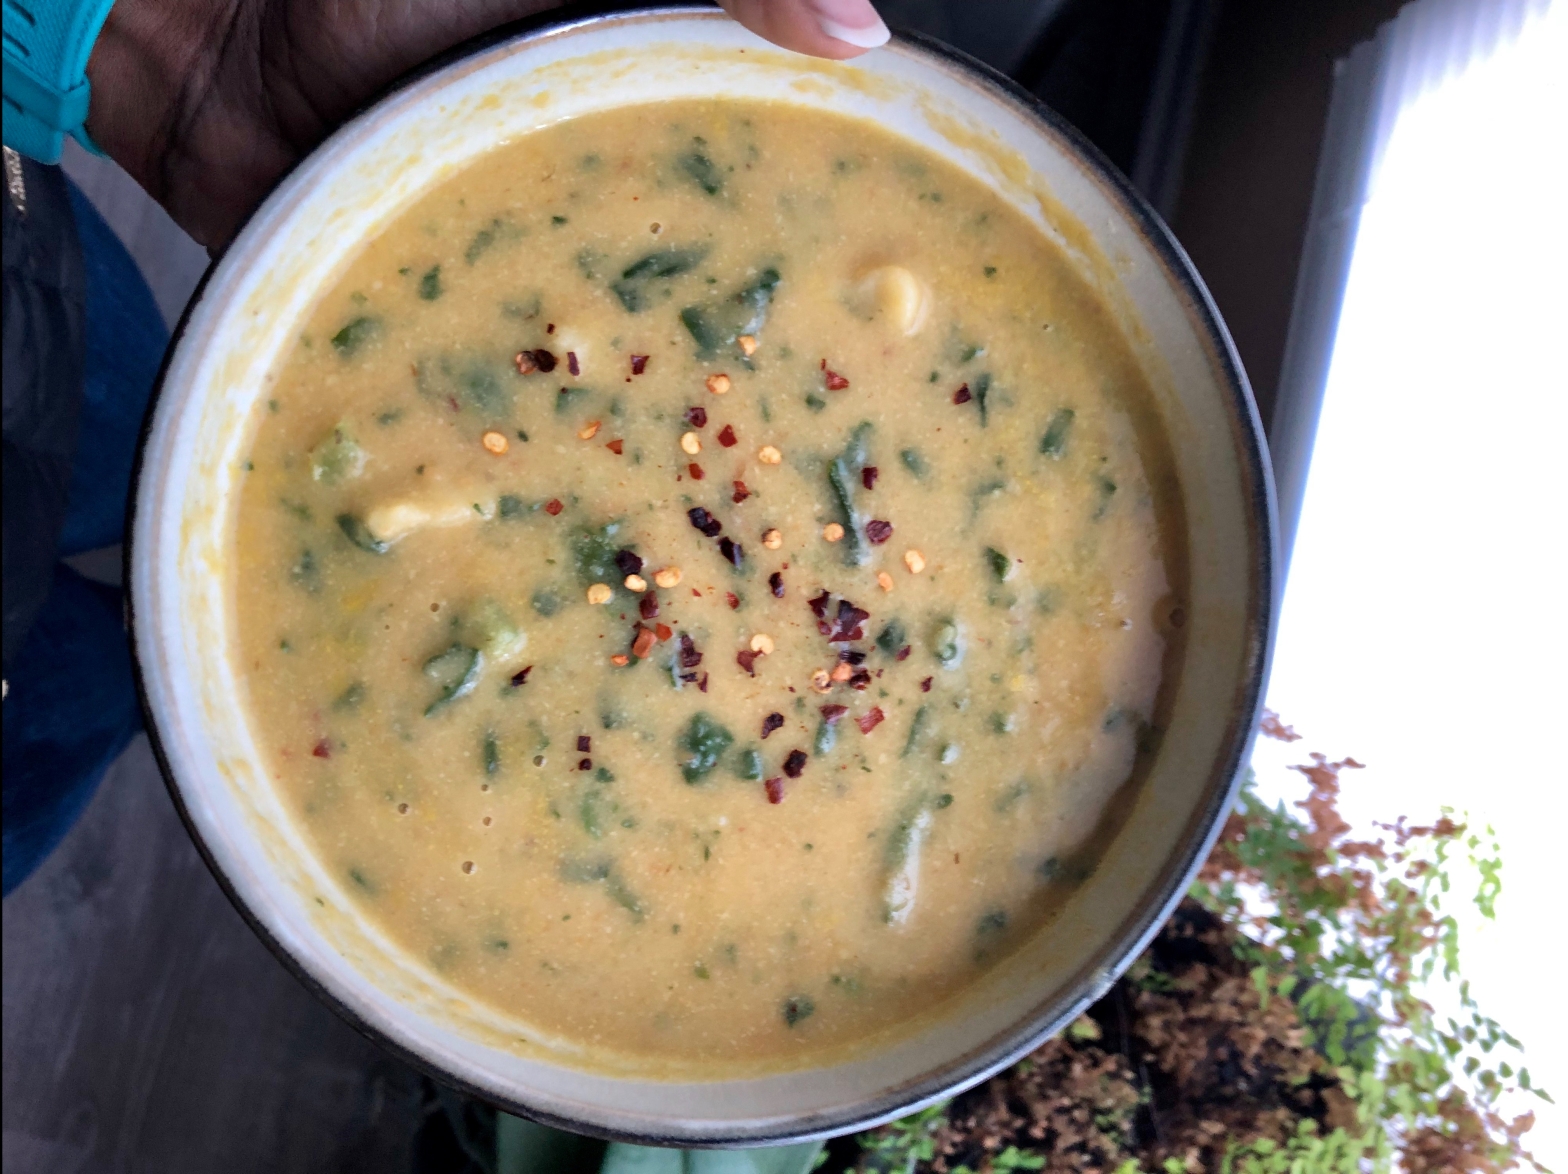
This hearty soup is so creamy and warming it makes you feel so good! It is ever so  slightly sweet but has a great depth of flavor. The gnocchi adds great texture and helps to keep you full. Don’t be intimidated by gnocchi! It is super easy to make and is totally worth it for the perfect little dumplings in your soup.
IMG_9583IMG_9584
I love soup especially when it is cold outside. This was exactly what I needed on a cold and rainy winter day. To be honest this recipe came out of using whatever I had on hand. I had two left over medium white sweet potatoes, some carrots and some leftover frozen mashed potatoes that I needed to use. But it turned out so great I just had to share.
Cook time: 1 hour-1.5 hours
This makes about 5-6 servings
Ingredients:

2 medium sweet potatoes ( I used white sweet potatoes but orange works well too)

1 medium carrot

1.5 cups mashed potatoes (2-3 medium potatoes, peeled boiled and mashed)

1.5 cups flour and extra for dusting

6 cups vegetable broth

1/2 cup nutritional yeast

2 cups spinach or baby kale or 1 cup frozen

1 tablespoons garlic powder

1 tablespoon onion powder

2 teaspoons Italian seasoning

1 teaspoon red pepper flakes

1 can white beans (kidney or cannellini) rinsed and drained

Optional: Sunflower seeds or hemp seeds for topping

Salt and pepper to taste
  1. Preheat the oven to 375 degrees Fahrenheit.
  2. Clean and pierce the carrot and sweet potatoes. Place on a lined baking sheet.
  3. Bake for 40 minutes until caramelized and soft.
  4. While your veggies are baking, peel, boil and mash your white potatoes. Let cool.
  5. Mix 1.5 cups mashed potatoes with equal amounts of flour. Kneed for 1 minute over a lightly floured surface. Dough should still be slightly sticky, avoid over kneading!
  6. Divide dough in to several even pieces. Take one piece at a time roll out into a long rope/snake and cut into even 1/2’’ pieces. (Optional: Roll 1/2’’ pieces of dough across a fork)
  7. Bring a large pot to a boil. Add a large pinch of salt. Add gnocchi in small batches and stir so that they don’t stick. Boil until the gnocchi float and then for continue to boil for one additional minute. Drain and set aside.
  8. Once your carrot and sweet potatoes are done. Let them cool to the touch and then peel.
  9. Add the carrot, sweet potato, white beans and vegetable broth to a large pot (Use the one from the gnocchi so you don’t have to wash it :P) Cover and bring to a simmer over medium heat.
  10. Let simmer for 10 minutes. Turn to down low. Using an immersion blender (or carefully with a regular blender) blend the soup until it is smooth and creamy.
  11. Add the gnocchi and the spinach. Add the nutritional yeast and seasonings. Season with salt and pepper to taste.
  12. Serve warm, and top with additional red pepper flakes and sunflower seeds!


Let me know what you think and if you try this recipe out!

How I spend Less than $50 a month on Food!

bagofproduce1
Via Google Images
pinterest
I’m on a tight budget. Even though I am able to afford to live differently I truly love the challenge  and benefit of living below my means. It also has the added benefit of being able to save up for cool things like trips to Japan or a new house. With that said I meal prep 100% of my meals. We do occasionally (rarely) go out to dinner but when we do it comes from a different part of our budget. I budget exactly $50 on groceries and don’t spend a penny more.
If you’d like the spark notes version here are my top tips:
1. Plan ahead. I plan what I’m going to cook and prep two weeks out. Down to basically everything I put in my body. Breakfast, lunch, dinner and snack every day (weekends I eat leftovers from the past week or the upcoming week, or make something new from what I have)
2. Pay cash. It’s hard to over spend when you literally don’t have any more money. Plus it hurts a bit more watching it go. *
3. Be flexible and have a back up plan. Anticipate wanting something other than what you’ve prepped. I fortunately don’t get sick of food very easily I can eat the same meal 4 days in a row and still want it on the 5th day. If you’re not that way, have a back up plan.
Here is my monthly food budget:
$40 meal prep groceries ($20 biweekly)
$10 for restocking pantry items
There are things that I always keep stocked with the extra $10.
I use that money to replace/restock:
  • Rice
  • Flour/baking needs (includes baking powder/soda)
  • Sugar
  • Oatmeal (good for baking or making milk)
  • Peanut butter
  • Spices and broths (includes soy sauce and things like vanilla extract)
  • Oil (vegetable and/or coconut)
I usually don’t run out of more than a 1-2 of these at a time but if I do and it would cost me more than $10, I prioritize, purchase what is needed and wait for the other items. There are also long periods of time where I don’t run out of these things, in that case I save up that $10 and purchase things (usually in bulk from Amazon) like vital wheat gluten, TVP, nutritional yeast, or nuts and seeds (chia, sunflower and flax) I like to keep around.
What the heck am I eating? 
My breakfast usually stays about the same: overnight oats, baked oatmeal cups, or breakfast burritos; all of which are super customizable. But for lunch and dinners, variety is the spice of life! I do not usually eat the same thing for lunch and dinner in a week but you can. Also I don’t eat on one meal longer than one week.
Here’s what it’s like for me. I research recipes on Pinterest, watch (too much) YouTube and go through my archive of recipes and homemade food pictures. I plan what I want for breakfast lunch and dinner for the next two weeks.
Here is an example of my plan:
Week 1
Breakfast: Breakfast Burritos (black beans, kale, corn)
Lunch: Sheet Pan Buddha Bowl: (Carrots, peas, corn, broccoli, chickpeas, kale with peanut sauce)
Dinner: Baked Jollof rice (carrots, peas, chickpeas, corn, tomato sauce)
Snack: Peanut Butter Crackers
Week 2
Breakfast: Baked Oatmeal Cups (kidney beans)
Lunch: Caribbean Red Beans and Rice ( red kidney beans, coconut milk)
Dinner 1-Pot Golden Curry Lentil Soup (carrots, coconut milk, lentils)
Snack: Peanut butter crackers
After I make my plan I make a list of what I need, based off of what I already have stocked.
My grocery list might look like this:
  • Canned Chickpeas x2 ($1.00)
  • Canned Kidney beans x4 ($2.00)
  • Canned Black beans x 1 ($0.50)
  • Uncooked Lentils ($1.50)
  • Fresh bagged Kale ($3.00)
  • Tortillas (8 pack) ($1.00)
  • Fresh bagged Carrots ($0.50)
  • Crackers, 1 box ($1.50)
  • Coconut milk x2 ($2.50)
  • Frozen broccoli ($0.50)
  • Frozen Corn ($0.50)
  • Frozen peas ($0.50)
  • Tomato sauce ($0.50)
Total $15.50
This is based on store brand prices from Walmart where I do most of my grocery shopping.
In reality I would almost never buy this much at once mostly because the bags of frozen vegetables, boxes of crackers, tortillas and bags of lentils last me quite a while so that I can just incorporate them into my plan and prep for the future. I often keep my breakfast the same for the two weeks for simplicity. I can prep it all at once, freeze it and pull it out when I’m ready. I also plan to use the same ingredients in different ways throughout the two week period. With that in mind my grocery bill is usually never even this high!
After I have my plan and list, I stop by the ATM and take out the money I need for the next two weeks*. I shop on payday after work (I’m usually tired so that helps me stick to the list!). I walk in with my list, my reusable shopping bags and $20.
I prep one week at a time on Saturday and/or Sunday’s.
There are times where I’ve prepped something and by Thursday I don’t want it anymore. Not a problem! Toss the prepped food in the freezer, and use your leftover groceries (or extra cash) to make something new! From my groceries I could make lentil balls or a lentil loaf, soup, stir fry, burritos, pot pie (don’t forget the flour and baking supplies!) and much more. You can even make desserts like chia puddings, cakes or cookies.
* I’ve been cash budgeting (think Dave Ramsey) for 9 months now and I’ve been able to save a LOT and pay off thousands of dollars in student loans. Cash budgeting has worked for me (and thousands of others) because there’s a different feeling when you swipe your card and money that you’ve probably never seen gets taken out of an account. It’s painless it doesn’t feel like you’re spending anything. But it’s different when you hand over a crisp $20 and you’re given $1.75 in change that you can see and tangibly feel. If you have trouble over spending or sticking to a budget, give it a try! Check out Dave Ramsey’s cash envelope system.
Here are some pictures of things I’ve made based on this budget! I definitely eat lots of different things with very little money!
IMG_7677
IMG_9477.jpeg
img_8212-1
IMG_8462.jpeg
IMG_8422
Soups (This is a one-pot lasagna soup)

Bread! *Oprah Voice*


img_7682
Pancakes, tofu scramble and seitan bacon
IMG_8788.jpeg
Baked Vegan Mac and Cheese
IMG_8829.jpeg
Lima bean ‘Tuna’ salad sandwich
img_8466
Enchiladas
img_9418.jpeg
Even cupcakes!
If you’re looking for more tips on saving money on groceries check out my Top Tips or my Sales and Couponing pages!

Vegan Sheet Pan Buddha Bowl Meal Prep

img_8462
Zucchini, kale, carrots, yellow squash, roasted tofu, sweet potatoes and corn.

pinterest

I love Buddha bowls. If I could eat a ton of veggies over rice with a delicious sauce for every meal I really would. This Sheet Pan Buddha Bowl is perfect for meal prep because it streamlines the process and allows you to cook everything all at once and not have to watch it on the stove. Also it is super easy to customize and to cook your favorite veggies.

Not only is this super easy and functional it is also beautiful and a great way to know you’re getting all of your nutrients. Eat the rainbow and don’t forget to take a pic of the photogenic plate!

img_9089.jpeg
Carrots, frozen broccoli, corn and peas, fresh green peppers, mushroom.  

I’ve done this prep so many different ways and with so many different veggies. Including spiralized veggies (left). That tray has sweet potato noodles, carrot noodles, white potato noodles, turnips and broccoli noodles. They all roasted up nicely and were perfect with hummus dressing.

Pictured right are fresh carrots, yellow squash, kale and zucchini, mushrooms and cabbage. As well as frozen corn, peas and broccoli.

img_8513

Don’t forget you can make your protein this way too. Like This crispy oven fried tofu.

img_8986
Pan roasted cabbage, carrots, beets, broccoli, and corn. Topped with hemp seeds.*

This is less of a recipe and more of a tip on how to quickly roast a ton of veggies for meal prep. So this is less of an ingredient list and more of a supply list. You will need:

1-2 baking sheets ( or more, but only two fit in my oven at a time)

Silicone mats or parchment paper (Definitely recommend the reusable silicone mats!)

Favorite (Seasonal?) veggies (fresh or frozen works well with both even try some lima, garbanzo or edamame beans!)

Cooked grains (brown rice, quinoa etc) or a bed of greens

Preferred seasonings ( I almost always use garlic and onion powder- get creative, try curry powder or Italian seasonings!)

Salt and pepper to taste


1. Preheat you oven to 375 degrees Fahrenheit. Line a baking sheet with parchment paper or silicone mats.

2. Prep your vegetables, chop to smaller uniform sizes add to baking sheet In an even layer. If using frozen veggies add directly to baking sheet in an even layer. Absolutely no oil is needed but you can add some if you’d like for flavor. Season to taste.

3. Bake for 25-35 minutes. Lighter or leafy vegetables like peppers or kale and cabbage may need to come out sooner depending on your taste, so check around the 25 minute mark. I tend more towards 35 minutes for larger or more dense vegetables like winter squashes, carrots and potatoes. If that is the case place those on a separate baking sheet so they can stay in longer.

4. Split the vegetables evenly in 4-5 containers that contain a bed of greens or grains.  Cover with a sauce or dressing of choice. Try this buddha bowl with peanut sauce!

IMG_8464.jpeg

*Nuts and seeds make great toppers for the Buddha bowl but would not do well cooked on the sheet pan!

Let me know what you think and if you give this a try!

Easy and Fast Oat Milk

pinterest

This is the easiest and least expensive plant milk you’ll make! Beginning to end in 3 minutes ( I actually timed myself!).

People are OBSESSED with Oatly oat milk. I’ve never had it before I just know it has a serious cult following. I can understand why people love oat milk, it’s so creamy and the ingredients are simple it just makes you feel good!

Probably one of the best parts is how truly easy and inexpensive it is to make this plant milk. Other plant mills require purchasing expensive nuts or seeds and soaking them and/or using an expensive high powered blender. My blender I got five years ago for less than $20 at a big box store and it’s perfect for this easy and delicious milk.

Here is how you make your own:

Ingredients

1 cup of old fashioned oats

4 cups of water

If you want to add sweetener or flavor (like chocolate or vanilla!) you can add it to taste.

1. Add water then oats to a a blender. Blend for 1 minute. Definitely do not blend any longer the milk will get slimy (Trust me!)

2. Strain through a nut milk bag or cheese cloth into a container. Seal tightly.

3. This makes nearly two quarts. Store in the refrigerator for up to 5 days!


Let me know what you think and if you give this a try!

Baked Vegan Jollof Rice

This African inspired baked jollof rice is so easy! You’ll have a warm hearty meal within an hour without standing over the stove.

IMG_9510.jpg

pinterest

I’ve really been enjoying the curry flavors this fall and winter. The warming spices carry so much flavor and are perfect for cooler days. Check out my slow cooker tikka masala and my one pot thai curry for more ideas!

Ingredients

½ diced yellow onion

2 tablespoons tomato paste

1 cup frozen peas*

1 cup frozen corn*

1 carrot chopped*

1 can chickpeas rinsed and drained

2 tablespoons curry powder

1 tablespoon of garlic powder

1-1.5 teaspoons of cayenne pepper ( adjust to your spice level!)

2 teaspoons ground ginger

2 teaspoons of paprika

6 cups boiling vegetable broth

3 cups of rice

Salt and Pepper to taste, it’ll depend on how salty your vegetable broth is.

This makes several servings about 8-10 servings as a side and at least six for a main. Perfect for a crowd, which I think jollof rice should always be shared. You can definitely half the recipe (keeping the whole can of chickpeas is fine).

*You can also sub the vegetables for 2 cups of a frozen veggie mix.


  1. Preheat the oven to 350 degrees Fahrenheit.
  2. Add all of the ingredients (except the vegetable broth and tomato paste ) into a large baking dish. Mix well until spices and rice are well incorporated.
  3. Add tomato paste to boiling vegetable broth and mix well. Add to baking dish and mix again.
  4. Cover tightly with foil and bake until rice is tender and liquid is absorbed about 45-50 minutes.
  5. Serve warm as a side or as a main!

Let me know what you think and if you give it a try!

Vegan Slow Cooker Tikka Masala

This vegan tikka masala is so easy and full of flavor. Just dump in your slow cooker and go. Ive made it several times this fall/winter because it is so hearty and warming.

img_9180

pinterest

I love my Crock-Pot. It is seriously amazing and if I could cook everything in it I would. I actually own two but was nice enough to let my baby sister take it with her to college. When she graduates this spring, I’m getting it back.

There’s something magical about dumping everything in the Crock-Pot walking away from it (or going to work!) and coming back to the aroma of delicious food ready for you to eat.

Curry spices are notorious for being a bit on the expensive side so consider this an investment in your spice cabinet. Most of these spices you can use again in other dishes like other curries or chili. The others will last a long time so you can make this dish over and over!


Ingredients:

4 cloves of garlic minced

2 tablespoons of grated ginger (or use 1 tablespoon ground ginger)

1 (29 oz) can of tomato sauce

2 tablespoons olive oil

1 tablespoon garam masala

2 tablespoons ground cumin

2 teaspoons ground coriander

2 teaspoons paprika

1 teaspoon turmeric

½ teaspoon cinnamon

¼-½ teaspoon cayenne pepper (according to how hot you like it!)

½ teaspoon black pepper

2 bay leaves

1-2 medium to large sweet potatoes cubed (Sub carrots or butternut squash!)

1 can of chickpeas drained and rinsed

2 cups of kale or 1 cup of frozen spinach

½ cup of corn

Salt to taste


1 can of full fat coconut milk

2 tablespoons corn starch

2 tablespoons of lemon juice


Prep Time 10 Minutes

Cook time 4-8 Hours


  1. Add all of the ingredients (except the coconut milk, cornstarch and lemon juice) to the slow cooker. Mix everything well.
  2. Cover and cook on low for 8 hours or on high for 4 until sweet potatoes are tender.
  3. In a separate small bowl, add the can of coconut milk and cornstarch. Mix well.
  4. Add coconut mixture into the slow cooker and allow to cook an additional 20 minutes until thick.
  5. Once thickened, mix in lemon juice.
  6. Serve warm over rice!

Let me know if you give this a try!

Fall Inspired Apple Butter Oats

IMG_9169.jpg

pinterest

Is anyone else completely obsessed with apple butter? Is it just a southern thing? If you’ve never had it please try it. It’s a smooth, caramelized and concentrated slow cooked version of applesauce. With all of the warm spices and apples it has such a lovely fall flavor. I absolutely love this stuff. It is great on biscuits (a staple of the south) and toast or just eaten with a spoon… 🙂

Slow Cooker Apple Butter 800 0378
via closetcooking.com

But I decided recently, why not add it to oats? WHY had I not tried this sooner? It added a sweet tang and fall flavor. I made them both as on the stove and meal prepped as overnight oats.

*Don’t worry; apple butter does not contain any butter. Most are vegan, its like a jam or preserves.*


Please let me know if you try this out!

¾ cup Old Fashioned Oats

1 cup plant milk stove top (I used ½ cup almond coconut milk and ½ cup water)

¾-1 cup for overnight oats

1 tsp vanilla

½ tbsp. cinnamon

Sweetener of your choice to taste (I’ve used both brown sugar and stevia before, try maple syrup!)

Pinch of salt

1 tbsp nut butter of choice (Optional but for protein and it is such a lovely nod to peanut butter and jelly)

1 tbsp apple butter


Stove top

  1. Bring your plant milk with a pinch of salt to a simmer on the stovetop in a small saucepan or pot.
  2. Add in the oats, sweetener, vanilla and cinnamon. Stir and cook until desired texture.
  3. Pour your oats into a bowl and top with apple butter and nut butter.

If you want to add some extra texture try some nuts or granola!


Overnight Oats

  1. Combine everything in your desired container.
  2. Let set overnight in the refrigerator.
  3. Serve cold or warm, for added texture try nuts or granola! Enjoy!